A peeling, blurry, or fast-failing logo turns a branded golf ball from a promo asset into a brand-risk item.
For most bulk custom golf ball programs, pad printing is the safer choice for 1–2 solid spot-color logos because it repeats cleanly on curved, dimpled surfaces. UV printing is better when the artwork truly needs gradients, full-color detail, or personalization, but only after the exact cover and finish are validated with adhesion proof and 20× macro photos.
You are not buying a pretty render. You are buying a printed ball that has to survive strikes, handling, receiving inspection, and internal approval. The right question is not only “Can you print our logo?” It is whether the method can hold the smallest detail, bond to the exact cover and finish, and produce release-grade proof before mass production.
Use this guide to choose pad or UV by artwork complexity, cover compatibility, finish condition, quantity, and approval evidence.
How Long Do Printed Logos Last on Golf Balls?
A clean office sample can still fail on the first real wedge shot. The risk is not only weak ink. The risk is approving a logo before you know whether the shell was actually prepared to hold it.
Printed logos last only when the ink bonds to the actual cover, not to residue left on the shell. Your buyer-safe approval path is a disclosed prep protocol plus an adhesion deliverable on the exact ball model and finish you will mass-produce.

The Hidden Culprit: Mold Release Agents & Plasma Prep
The peeling disaster usually starts in the wrong place. Buyers focus on color, sharpness, and artwork accuracy, but early failure often comes from the shell surface. If mold-release residue is still sitting on the ball after molding, the ink is not truly bonding to the cover. It is bonding to contamination. That is why a sample can look perfect on day one and still start flaking after light wedge use.
This becomes a brand problem the moment the balls leave your office. The logo survives the proof meeting, survives the approval email, and then breaks down when a guest actually uses the ball. At that point, you are no longer debating print quality in theory. You are explaining why the sponsor mark looks cheap in public.
The silent killer of logo adhesion is mold-release residue. If a factory prints directly onto the shell without proper surface preparation, the ink does not bond to the cover. It bonds to contamination. That is why the first useful buyer question is not “Pad or UV?” It is: What is your surface-prep protocol before applying ink? If the supplier cannot explain whether it uses plasma treatment, dedicated chemical washing, or another controlled prep step, then any durability promise is still incomplete.
This is where ISO 2409, ASTM D3359, cross-hatch, and tape pull check language becomes useful. Those methods do not turn adhesion into magic. They turn “durable” into something visible and classifiable. You do not need to memorize every clause in the standards. You need the deliverable: a cross-hatch grid on your exact cover and finish, the tape pull, and the before/after file tied to the sample ID and production batch or date. Many buyers use top-tier pass language around ISO 2409 Class 0–1 or comparable top-grade tape-test outcomes, but the real protection is the file, not the adjective.
Use this clause in the approval file: Supplier shall provide an adhesion evidence file using the agreed cross-hatch/tape-pull method, including method name, sample ID, finish, production batch/date link, and before/after images or video for the approved ball model. The failure signal is blunt because it needs to be: Pretty render, no adhesion file.
✔ True — Adhesion starts with surface preparation
A clean-looking logo does not mean the ink bonded to the cover. Ask for a written prep protocol, such as plasma treatment or controlled chemical washing, plus a batch-linked cross-hatch or tape pull check on the exact ordered ball.
✘ False — “If the sample looks sharp, the logo will survive play.”
Sharpness proves resolution, not bonding. A logo can look perfect in the office and still peel early if the shell was printed over residue instead of a properly prepared surface.
Pad vs. UV Printing for Golf Balls: Which Is Better?
Choosing by buzzword is how buyers overpay for the wrong process. The danger is simple: a method can sound premium and still be the wrong answer for the artwork at real size.
Pad printing is usually the safer industrial choice for simple solid-color logos, while UV earns its place when the artwork truly needs gradients or fine detail. The decision becomes buyer-safe only when you approve it with 20× macro photos and adhesion evidence on the final ball type.

The 20× Macro Photo Rule for Micro-Text
The wrong-method mismatch usually happens in two directions. A simple one-color or two-color corporate mark gets pushed into UV because it sounds more advanced, even though pad would often be the lower-risk choice for repeatability and alignment on a curved surface. Or a gradient, photographic, or fine-detail design gets forced into pad, and the result comes back with weak registration, edge breakup, or detail loss that should have been obvious from the file.
The safer rule is to shortlist by artwork physics first. If the design is one or two solid spot colors, pad printing is usually the lower-risk default because it is easier to repeat at scale and easier to control on spherical, dimpled surfaces. If the design truly needs gradients, photo-like detail, or complex full-color rendering, UV may be the right route. But UV is not a free upgrade. It brings more sensitivity to process control, more dependence on topcoat and cure discipline, and more chances for durability trouble if the file is approved too casually.
| Artwork risk | Safer method | Why it fits | Next step |
|---|---|---|---|
| 1–2 solid spot colors | Pad printing | Repeatability and cleaner industrial alignment | Approve with on-ball proof and adhesion file |
| Gradients or full-color detail | UV printing | Needed for complex image rendering | Approve only with macro proof and controlled topcoat evidence |
| Micro-text or thin lines | Method chosen by macro result | Small details fail first on curved surfaces | Reject if 20× macro edges break up |
The jagged-edge trap is where this becomes obvious. The smallest text and thinnest lines are always the first parts to fail on a golf ball because the dimple pattern punishes weak edge control. That is why the approval standard should escalate immediately to 20× macro photos. If the slogan turns fuzzy, the method is wrong. If the smallest text fractures at the edge, the method is wrong. If a thin rule line collapses into the dimple surface, the method is wrong. The failure signal here should stop the run fast: Full-color request on a method that cannot hold the detail.
Here’s a quick look inside a golf ball logo printing workshop so you can see how print setup and in-process checks work in real production.
Here, I’d like to share a case we handled 2 years ago. A UK retailer brought us a rescue job after their previous supplier forced a complex multi-color logo into a basic pad-print run, resulting in blurry edges and retail returns. When our team took over, we shifted the order to UV printing to lock in the crisp detail. To guarantee the result, we refused to start mass production until the client approved our 20× macro edge photos. The final delivery was razor-sharp, proving you must validate edges on the real ball—not on a digital screenshot.
For North American and EU buyers, proof discipline usually matters more than a lower per-ball print quote. Use one release clause that removes ambiguity: Supplier shall not release mass printing until the approved on-ball proof, print method, ink series, cover type, finish, and 20× macro photos are confirmed in writing against the golden sample. In corporate programs, a readable, durable logo often creates more value than a more complex artwork file that is harder to execute well.
✔ True — The artwork decides the shortlist before preference does
Use 20× macro photos to approve the smallest text, not just the biggest logo shape. If the minimum detail fails at real size, the process is wrong for the job.
✘ False — “Any premium-sounding print method can execute any logo equally well.”
Curved dimpled surfaces punish weak method selection. The wrong method can cost more and still deliver worse edge quality.
Does Logo Printing Affect Golf Ball Performance?
Some buyers assume print durability is only cosmetic. The real risk is approving a protective build that helps the logo but creates a new problem on the ball surface.
Logo printing can affect performance if the protective build is poorly controlled. Your safer buyer stance is to require clear-coat control and validation, not to approve a heavy protective layer just because it looks safer for the logo.
Clear-Coat Control and Dimple Aerodynamics
Golf-ball dimples are functional aerodynamic structures, which means any uncontrolled build on top of them deserves engineering skepticism, not just cosmetic approval. This matters most on UV work because full-color and higher-detail jobs often involve more process layers and more concern about abrasion resistance.
The buyer-safe question here is not “Can you add more varnish so the logo lasts longer?” The buyer-safe question is: How is the protective build controlled and validated for this print method and this finish? Aerodynamic studies show that standard golf ball dimples are incredibly shallow—often around 250 microns deep. If a factory sprays a heavy, unchecked UV clear coat, it reduces dimple volume and drastically alters the drag coefficient and flight trajectory. That is why controlled OEM facilities like ours limit protective topcoats to a strict 10–25 μm thickness—thick enough to prevent chipping, but thin enough to preserve aerodynamics.
A useful approval mindset is simple: topcoat build must be controlled and validated. Not assumed. Not sprayed heavier “just in case.” Not approved because the ball looks glossy and protected. If the protective layer is uneven, too heavy, or poorly cured, you may solve one problem and create another. That is why the release condition should stay bounded and practical: Do not approve UV durability claims without controlled topcoat and cure language.
✔ True — Topcoat control is an engineering control point
Protective build should be controlled and validated, not treated like a decorative afterthought. Buyers should ask how the layer is applied, cured, and tied to the approved print method.
✘ False — “More protective coating is always better for a printed golf ball.”
More protection is not always safer if the build is uncontrolled. The correct question is how the factory controls and validates the layer on the final print system.
Can You Print on Urethane Golf Balls?
A generic print sample can make this look easier than it is. The real risk is approving print capability on one ball and expecting it to transfer cleanly to another.

Yes, you can print on urethane golf balls, but you should not approve them as if they were Surlyn. Surlyn and cast urethane have completely different surface energies. An ink system and hardener ratio tuned perfectly for a Surlyn cover will often fail an adhesion test on a softer urethane cover. Your adhesion deliverable must be performed on the exact cover material and finish you are buying, because a generic sample does not prove chemical compatibility.
Does Matte vs. Glossy Finish Change Print Results?
One ink system does not automatically travel cleanly across every ball type. Cover chemistry, finish condition, and cure logic can all change the result enough that a previous approval stops being protective. That is why a generic “we can print golf balls” sample is not good enough for procurement.
Surlyn and urethane should be treated as different print-approval jobs, not interchangeable surfaces. Matte and glossy should be treated the same way. They can change how color reads, how sharp an edge appears, and how weak details reveal themselves under normal viewing conditions. So the buyer-safe rule is simple: if the cover, finish, ink series, hardener setup, or cure settings change, the proof package changes too.
| Cover/finish decision | What can go wrong | What to request | Next step |
|---|---|---|---|
| Surlyn glossy | Color and edge appearance differ from the ordered finish | On-ball proof plus adhesion file | Approve on the final finish only |
| Urethane matte | Bonding and visual read may change | Exact-cover adhesion evidence | Do not substitute from a Surlyn sample |
| Cover switch after proofing | Approved sample no longer predicts the run | New proof and test file | Stop approval until revalidated |
The failure signal should be familiar by now: Generic print sample on a different cover. That means the supplier is still selling capability when the buyer needs compatibility. No approval should transfer from one cover or finish to another without revalidation. That is how you keep a clean sample from becoming a misleading sample.
✔ True — Cover and finish changes can reset print risk
Matte versus glossy, Surlyn versus urethane, and even ink-series changes can alter the final result enough that a previous approval is no longer protective.
✘ False — “One print sample proves the supplier can print every golf ball cover equally well.”
A generic sample proves capability. A final-cover adhesion file proves compatibility.
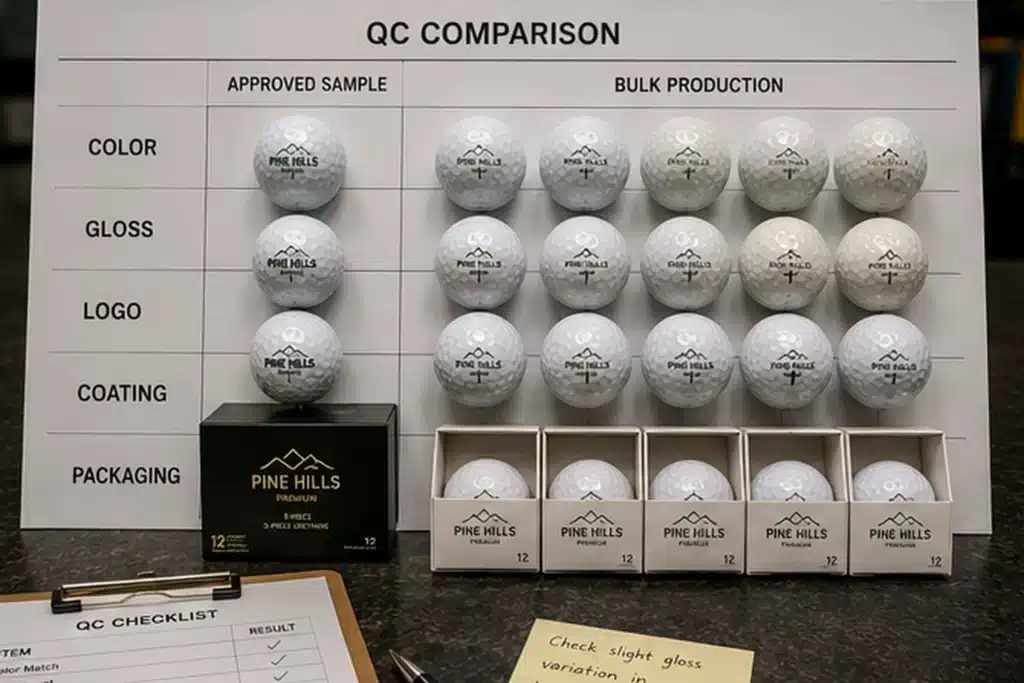
What Should Your B2B Print QC Checklist Include?
If your acceptance language is vague, every print dispute becomes subjective. The risk is not only poor output. The risk is losing the ability to enforce what was promised.
A useful B2B print checklist converts quality from opinion into evidence. If the supplier cannot show bonding, edge clarity, registration, color intent, consistency, and compliance records in one release logic, the order is not controlled enough.
![]()
What to Request Before You Release the Run
This is where print quality stops being a style discussion and becomes a procurement file. Keep one buyer-side evidence file that ties the proof, the method, the ball type, and the batch together. That file should include the on-ball proof, the adhesion evidence, the macro edge proof, the compliance documents, and the lot-linked QC record. If those items do not line up, the print program is not really controlled.
A good supplier can explain this file cleanly and quickly. A weaker one will scatter the evidence across chats, screenshots, and promises. That is why buyer-side release logic should be document-driven, not memory-driven.
| QC dimension | What can go wrong | What to request | How to verify | Accept/reject rule |
|---|---|---|---|---|
| Adhesion | Peeling/chipping | Adhesion photo/video log | Evidence tied to batch/date | Pass per agreed method |
| Edge clarity | Jagged micro-text | 20× macro photos | Smallest text readable | No edge breakup |
| Registration | Color misalignment | Multi-color proof + macro | Visual alignment check | No visible offset |
| Color intent | Brand mismatch | Proof with codes + record | Approval under defined lighting | Matches documented method |
| Placement | Off-center | Print area dimensions on proof | Random sample photos | Within agreed language |
| Consistency | Sample ≠ mass | Pre-production sample + QC log | Spot-check photos across run | Matches golden sample |
| Compliance docs | Customs/retail delays | MSDS + ink brand/series + compliance statement | Docs match destination requirements | Docs received pre-production |
The acceptance rule is blunt because it needs to be: release bulk only when the checklist items are complete and internally consistent. If the adhesion file is generic, the macro photos are from a different ball, or the MSDS + ink brand/series file does not match the approved process, the order is not ready to run.
How Should You Approve Print Proofs Before Production?
A fast reply is not the same thing as a controlled proof path. The risk is approving the artwork without approving the real production condition behind it.
The best proof is the one that makes the next production step harder to misunderstand. You should approve a proof package that includes the artwork version, print area, ball type, finish, method, macro images, and the test deliverables that will govern the run.
![]()
From Artwork File to Release-Grade Proof
This is where supplier communication maturity becomes part of quality control. A weak supplier says, “Send the logo and we’ll make it look nice.” A stronger one answers with process language: file type, print area, method shortlist, macro-proof requirement, adhesion deliverable, and what will happen if the finish or cover changes. That difference matters because responsive sales language can hide a proof path that is still full of ambiguity.
Your safer proof route starts with file discipline. Approve vector artwork whenever possible, or a real-size file that does not hide detail loss. Then require print area dimensions and placement notes. Then require the on-ball proof on the final ball type and finish. Then require the macro images and adhesion deliverables that will govern the run. At that point, the proof stops being an artwork conversation and becomes a release-grade production file.
Use this RFQ wording before mass production: Please provide the print method, ink brand/series, surface-prep protocol, adhesion-test deliverable, 20× macro proof photos, and the batch-linked QC evidence for the final ball model and finish before mass production.
That prompt works because it tests both process control and communication quality. A reliable supplier will answer with method and deliverables. A weaker one will answer with reassurance and ask you to trust the sample. The safer partner is usually the one who makes the next step harder to misunderstand in writing.
FAQ
Which printing method is best for golf balls?
The artwork and the proof standard decide the method, not generic process prestige. Pad is usually the lower-risk answer for simple one- or two-color logos. UV earns its place when gradients or fine detail genuinely require it and the result has been validated on the final ball type.
Approve the method from the on-ball proof, the adhesion evidence, and the 20× macro photos. A beautiful sample on the wrong substrate or at the wrong detail level is still the wrong method.
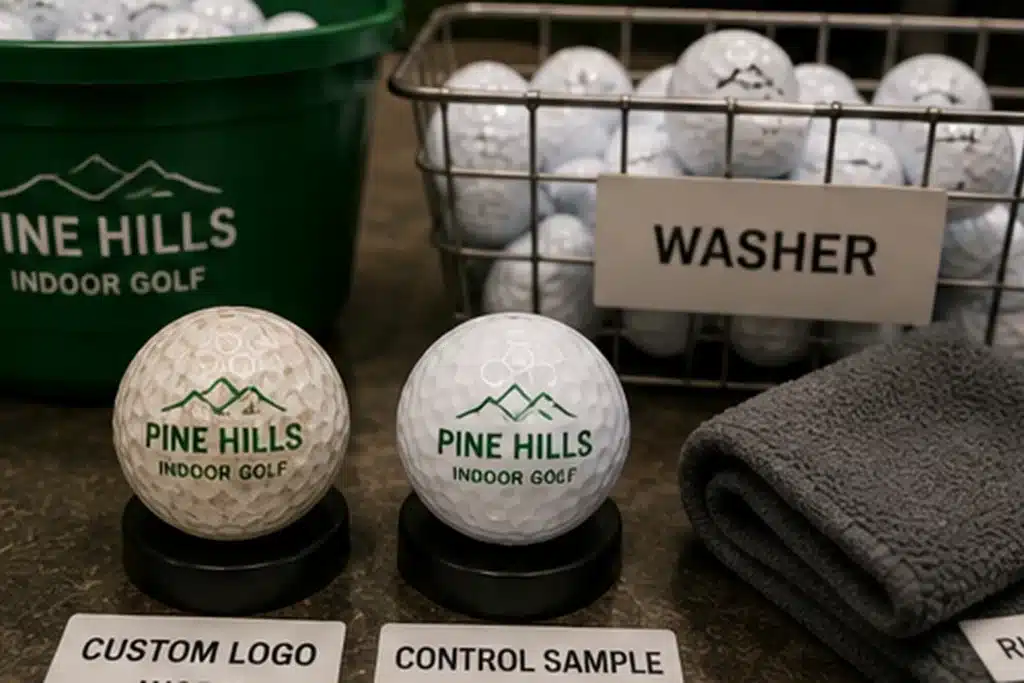
How do you prevent golf ball logos from peeling?
You prevent peeling by controlling prep and proving bonding, not by accepting a verbal durability promise. Ask for a surface-prep protocol, then ask for ISO 2409 or ASTM D3359 style evidence on the exact cover and finish you are ordering.
That means the method, the sample ID, the finish, and the before/after file should all match the approved ball. If those details are missing, the durability is still unverified.
Can you print on urethane golf balls without problems?
Yes, but only when the print system is validated on that exact material and finish. Urethane should not be approved as if it were Surlyn, and matte should not be approved as if it were glossy.
No generic sample is enough here. Use exact-cover adhesion proof, and require a new proof if the cover, finish, ink series, hardener ratio, or cure settings change after approval.
Does matte or glossy finish change print results?
Yes. Finish can change how color reads, how edges appear, and how weak details show up under normal viewing conditions. That is why finish-specific proof discipline matters.
Approve under a defined viewing method, not from a screenshot. A logo that looks clean on glossy can read harsher on matte, and a color that feels acceptable under one finish can drift visually on another.
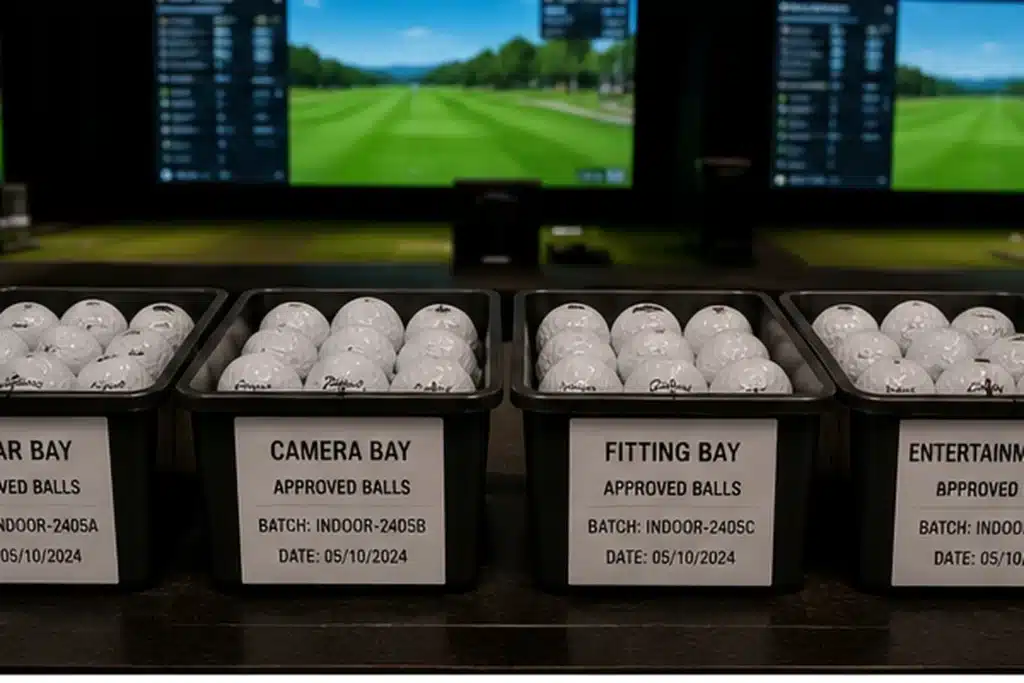
What evidence should a factory show before a bulk print run?
A release-grade proof package should include an adhesion file, 20× macro proof photos, a pre-production sample, and batch-linked QC and compliance records. If any of those are generic, the approval is still weak.
The point is not to collect paperwork for its own sake. The point is to make sure the proof, the method, the ball type, and the batch all point to the same release logic before money and production move too far.
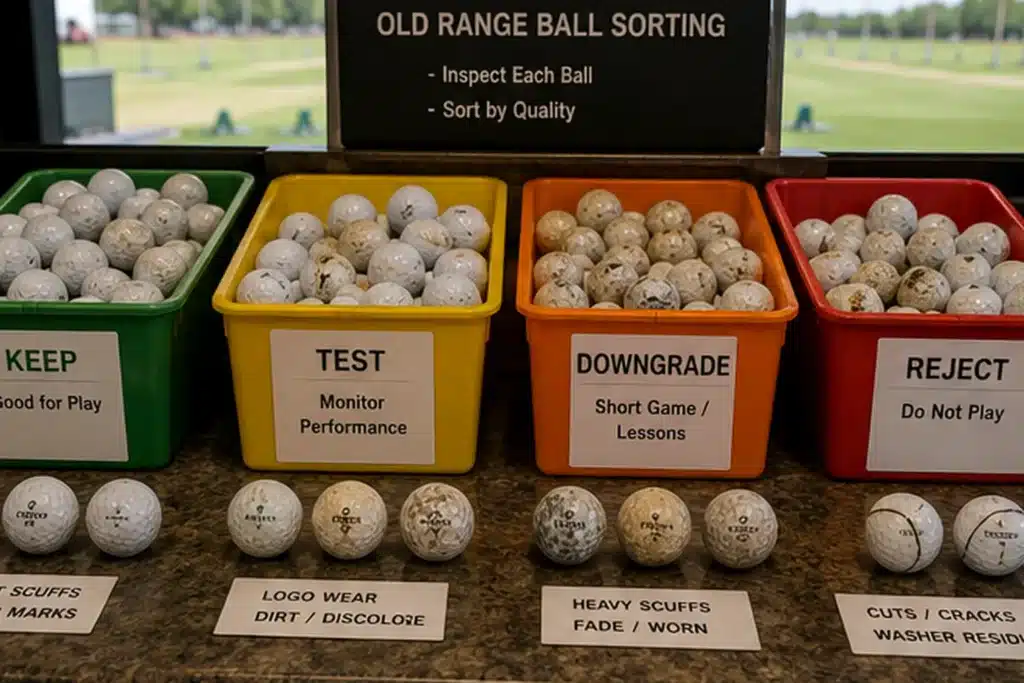
How do you know if a supplier really controls print quality?
They answer with method, deliverables, and release logic — not just confidence. A supplier that really controls print quality ties the proof to the final ball type, names the method and ink series, explains the prep protocol, and reduces ambiguity in writing before production starts.
That is the best extension of every section above: choose the supplier that makes the process clearer, not the one that only sounds certain on a call.
Conclusion
The right print method is the one that survives your actual substrate, artwork, and approval discipline.
Choose pad or UV by artwork constraints. Approve adhesion on the exact cover and finish. Use 20× macro photos for micro-text and edge quality. Treat clear-coat control as a functional variable, not a decorative afterthought. Release bulk only against a complete evidence file.
That is how you turn golf ball logo printing from a pretty sample exercise into a controlled B2B process.
You might also like — 2026 Guide to Golf Ball OEM in China: Factory Audit Checklist & Sourcing Secrets